Saturday, June 27, 2015

How to paint Seekers of Slaanesh (quickly & for beginners)

This is a How-to similar to my previous How to paint Bloodletters.


Introduction

Not much to say really, if you've already read the introduction part of the previous post. I'll keep the techniques simple and efficient, so as to bring the girls to a good standard in a relatively short time. I'd just like to point out that I'll keep them looking as canonical as possible.

Getting to it

Step 0. Extract your models from the sprues and glue them together. Not detailed here.

Note. You might not want to glue them completely together. Above, the riders are placed on their steeds, but they are not actually glued on. It's much easier to paint that way.

Step 1. Prime your models in white

Priming the models in white is even more important this time, since we're going to use that as a half-basecoat. You'll see what I mean with the next step.


Step 2. Purple wash

I don't have a purple light enough to work as a skin color here. I didn't know about advanced techniques (such as layering) back when I painted these models; but even if I did, I was looking for a fairly quick way to do this. (And probably so are you, if you're reading this.)
So here goes: heavily water down Hormagaunt purple until it reaches a wash-like quality. Then apply generously to the model.
I don't have a picture of this, but take a look further down. You can see this color on every model, where skin is visible.

Step 3. Basecoat

Steeds: purple scales, grey claws, green tongues, white horns, leather brown saddles, red eyes, silver anklets, dark green bases. I've mixed up a pinkish color for the frills; this is the same mix I've used for the girls' hair. Also, since no slaaneshi model is complete without breasts, I've applied some fleshtone to the steeds'.


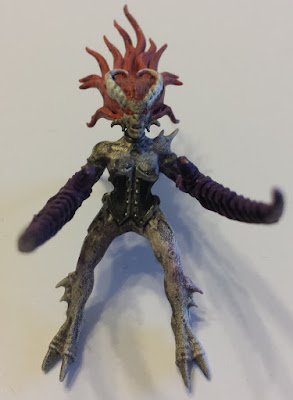
Riders: white horns, red eyes, grey claws on the feet. Silver and black on the armor: I've used black as the base and colored the raised areas in silver to give the impression of black leather framed by steel. Purple on the hands/claws - the same color used for the steeds. Pinkish hair; I've mixed this color using red, orange, white and purple.


Neither the white graffiti primer, nor the purple wash technique is perfect on its own. As I've said previously, the spray paint tends to be too thick. The wash-like paint tends to flow around the model, not leaving a uniform layer. However, these girls look perfect. These aren't historical miniatures - they're Daemons. The small discolorations and imperfect skin only reinforces their otherworldly appearance.

(still not glued together)

Step 4. Black wash

Slightly water down the black wash, then apply over the entire model. This pops out all the details and tones down the colors.

Step 5. Drybrushing

Drybrush every area with the same color it was basecoated with. As per the theory, this leaves the recesses shadowy, while brightening up the middle of the area for a basic lighting effect.
You can drybrush the skin areas with either the same shade of purple, or white; depending on whether you'd like to brighten or darken the skin tone.

Step 6. Basing

For my slaaneshi daemons, I'm going for a green grass / forest soil effect on the bases. They spread happy feelings - right up to the moment they kill you!


Step 7. Glue the riders in place


This is final color scheme. I know, it looks somewhat rough. However, on the battlefield, you are less likely to see them up close and well illuminated. You will rather see something like this:

... and the human eye will make sure to blend the colors together, creating perfect transitions for you.


Wednesday, June 24, 2015

Monday, June 22, 2015

How to paint Bloodletters (quickly & for beginners)

I'm sharing my award winning (:D) 5 step method of painting Bloodletters. I only use basic techniques and the end result looks pretty good.


Introduction / rant (skip this to go straight to the painting part)

I was looking through some painting videos on miniwargaming (more specifically, a show called Quick Tips) and I was happy to notice that there are several takes on painting Warhammer Daemon models. In fact, there are several for painting Bloodletters:
Go ahead and watch them if you want/can. They're great as idea providers. However, I wouldn't paint my Bloodletters like that. In fact, I feel that the above videos may apply to you, if you:
  • own a large selection of paints;
  • are already an accomplished painter;
  • have a large amount of time;
  • don't mind that your models look kind of "uncanonical".
None of the above apply to me (otherwise I wouldn't be writing this rant). I own a reasonable selection of paints (about 25 colors, including a single kind of wash), but nothing to compare to what Kris uses in the videos (about 5 shades of red, for starters). I have mastered the basic techniques (or so I like to think), but I wouldn't call myself a pro painter. Neither do I want to spend a large period of time per model, preferring to get them on the tabletop in a reasonable amount of time. Also, I want my models to look as canonical as possible. So there's that.
If you think you can relate to the above, read on.

How to paint Bloodletters (quickly & for beginners)

Paints used (Vallejo range)

  • Gory Red
  • Black  
  • Chain Mail
  • Bright Bronze
  • Stonewall Grey
  • White Primer
  • Black Wash
  • Scorpy Green, Sick Green, Ultra Marine Blue (small quantities)


Step 0. Extract your models from the sprues and glue them together. Not detailed here.


Step 1. Prime your models in white

A white primer is important, since I'm doing bright colors here. Of course black would also work, but it would require several coats of red to achieve the same brightness. That's basically a waste of time and paint.


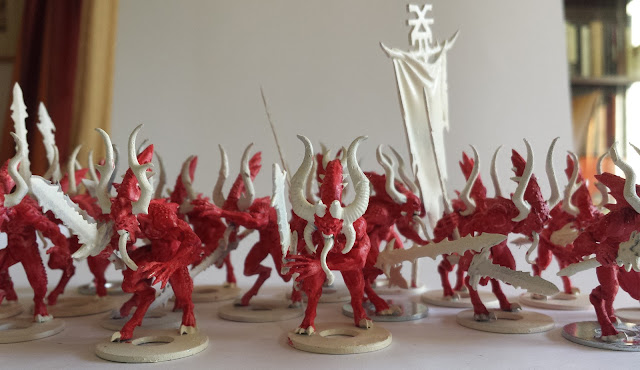
Bloodletters primed with the graffiti spray


Step 2a. Basecoat the skin

A single coat of slightly watered down red paint will suffice here. This will save both time and paint, and will look just right thanks to the white primer underneath.


Menacing enough?

Note. In a less demanding environment, these models are tabletop-ready! Indeed, they already look a lot better than unpainted ones, and I have played some games like that - check out the battle reports.


Step 2b. Basecoat the rest of the model

Grey for the claws on the feet. Bronze on the sword hilts. Black on the sword blades, tattoos and base. Bone white or white on the horns, teeth and other boney protrusions on the body. Various colors on the tongues.

Notes. 

Since bronze is usually a weak paint, give it a coat of silver/gunmetal first, then cover it up with bronze.
You can do a molten effect on the sword blade or whatnot, but I promised quick and easy solutions, so we're skipping that.
Leave the base for last, as you will most likely have paint drip on it while painting.
White works just as well on horns. I've used that for the first generation of models painted.
I used tongue color to tell the different Bloodletter squads apart. This really helps when two 20-man hordes get into the same melee. Colors used so far: neon green and blue-green. I'll do my last two squads with blue and violet.


Step 3. Wash the model with black

Water down the black wash slightly, then apply generously to the model. This will make all the details pop out (muscle groups, ridges on the horns, Khorne symbols on the sword pommels, eyes, teeth etc). It will also darken the colors; most importantly, the overall skin tone.


Step 4. Overall drybrush

Drybrush the horns with white/bone white. Slightly and very carefully drybrush the sword hilt and tattoos with bronze; use a fine detail brush. Same procedure on the tongue; use the same color that you basecoated it with. Then grab your large drybrushing brush, and go over all the raised areas of the skin of the model with red: muscles, back, legs, arms, chest, head etc. This is the same effect used on the banner, to give it a bloody appearance.

Note. If you can't / don't want to allocate more time for your Bloodletters, stop here and have fun wargaming!


Step 4.5 Optional. Overhead drybrush

The previous drybrush will highlight everything on the model; it will look decent, but not realistic. So I applied a second drybrushing. This time, it's an overhead passing. That means that you should take a look at your model, looking straight down on it, and mark the visible areas. This is what you need to highlight, to simulate an overhead light source, such as the sun. You can use the same red color, or add some white to it to have a more visible highlight.


Step 4.6 Optional. Correct mistakes

Drybrushing (especially if you're not very used to it) will invariably leave paint on areas where you didn't intend to. You will most likely get some red on the horns while drybrushing the head (or vice-versa, get white on the head while drybrushing the horns). So use a fine detail brush and tiny amounts of paint to correct your mistakes.


Step 5. Basing

I went for a basing convention for my Daemon army. I'm basing Khorne daemons, for example, with something that looks like volcanic rock/coal - signaling the end of all life where these guys go. You can go with whatever you'd like. Just make sure you spray some sealant on the finished base or otherwise make sure it won't fall apart at the slightest touch. I used a brush to cover these bases with a matte varnish. This forms a coat strong enough to keep the little stones in place.


Finished!


Thursday, June 18, 2015

Review: StarCraft: The Board Game

This is my first board game review. Sort of. I'm not going to duplicate the publisher's description of the game, nor am I going to take photos of every component. It's a 2007 game, so you can find all that on the internet. You can start on BoardGameGeek. I'm taking more of a wargamer's perspective here.

Introduction

I'm a huge fan of StarCraft. I own both PC games (and their expansions). It was only logical to jump on the occasion to play the boardgame version. The first attempt, however, failed. We made the mistake of starting at 00:30, after a large meal and a couple of beers. Explaining the rules took a very long time; there were some distractions; and we were very, very tired. We played the game halfway through, then quit around 03:00. I wasn't discouraged at all, though. In fact, I could barely wait for a second chance. This time, we started at around 16:30, and we were completely sober for the first hour or so. It went much better!

As a wargamer...

This game has a lot of miniatures!
Here you can see everything on display, for all 6 factions. You get 3 of each advanced unit, and a couple more of the basic units.
Obviously, the miniatures aren't "wargaming quality" - they are not as detailed, or precise. However, I'm thinking that this game could be an excellent hobby starter (much like Shadows over Camelot was for me). You could take them and paint them up as they look like in the PC game, with decals and markings making up for the lack of obvious distinction. It would be a great way to get into painting and learn the basic techniques.

Gameplay and impressions

You might have already guessed, but the ruleset is fairly complex, and not meant for casual gamers.
However, it's nothing compared to a wargame such as Warhammer. After the first round, we started getting into our regular boardgame-y mood (helped along with snacks, pizza, coke and whiskey). In fact, as we progressed, there were fewer and fewer rules mistakes! (Although, to be fair, unintentional mistakes, caused by being tired, did start creeping in.)

The second round of conquering the galaxy


Knowledge of the PC game helps a lot with the basic concepts. It will also produce tons of funny moments, quotes and sound imitations. (It will also annoy you, when you realize that you can't produce 12 Battlecruisers.)
Being a wargamer helps a lot with understanding moves, attacks and combat in general.

Arcturus Mengsk invades a world held by Judicator Aldaris...


Expect lots and lots of tactical moves. Foreseeing what your enemy will do and countering it, foreseeing how the enemy will counter your moves if you take first turn, and generally thinking ahead will be at the order of the day while playing the game.

... allowing Tassadar to hold on to his built-up forces.


Once you get the gist of it, the game is really deep and fun. We kept on going for about 5 matches, finishing around 03:00 in the morning!

Wednesday, June 17, 2015

Chaos Daemons vs Eldar, 16.06.2015

For the first time in history, I battle non-Space Marines!

Mission: Spoils of War
Map: Dawn of War
Lists: 1000 points
Chaos Daemons: Combined Arms Detachment
  • 3 Nurglings
  • 10 Pink Horrors, champion, icon, instrument
  • 5 Furies of Slaanesh
  • 5 Seekers of Slaanesh, champion, icon, instrument
  • 3 Screamers of Tzeentch
  • Kairos Fateweaver, warlord
  • Daemon Prince of Nurgle, exalted reward, minor reward, lvl 3 Psyker, armor, wings
The Nurgle Prince rolled on Biomancy and got the Grimoire of True Names. No Iron Arm, sadly.
I tried to convert my Shooty Flying Circus to 1000 points. I didn't like the result. It didn't perform as well, either.

Craftworld Eldar: Combined Arms Detachment
  • Dire Avengers
  • Guardians with missile launcher
  • 5 Striking Scorpions, with Exarch
  • 6 Swooping Hawks, with Exarch
  • Farseer, level 3 Psyker, Telepathy
  • 5 Wraithguard
  • 5 Wraithblades
  • Wraith Lord, warlord
The Eldar won the roll off and deployed first.
Going from the bottom: Dire Avengers and Scorpions in the lower ruin. Wraithguard and Farseer in the open. Wraithlord in the center tower - an interesting choice, given that it cannot move down from that position. Wraithblades in the open. Guardians and Hawks in the upper ruin.
Going from the bottom: Kairos (proxied by the white Daemon Prince) and Screamers behind the tower. Nurgle Prince behind the house. Infiltrated Nurglings, ready to grab objectives. Pink Horrors behind other ruin. The Seekers will Outflank, the Furies will Deep Strike.

Eldar, turn 1.
Wraiths move up along with the Scorpions. Some ineffective shooting took place, although it did make the Nurgle Prince jink. Hawks jump off the table.

Daemons, turn 1.
Nurglings grab cover. Screamers move up, then turbo-boost over the scorpions, killing 1 or 2 with slashing attacks. Flying Daemons swoop up and let fly with various psychic powers - also largely ineffective.

Eldar, turn 2.
The Scorpions moved back to assault the Screamers. Luckily, they failed the Fear test (whohoo! first time I got to use it) and didn't wipe out them out.
The Wraithguard move up and open up on the Nurgle Prince; 2 hits, but luckily no 6's on the Destroyer table, so I jinked everything.
The Wraithblades annihilated the Nurglings with S7 attacks. This was my mistake; it looked like a long charge through difficult terrain. Some lucky rolls however made sure that they closed the distance really quick.
The Swooping Hawks arrive behind the house, and open up on the Horrors, killing some off.

Daemons, turn 2.
A largely ineffective turn. I managed to kill 2 Wraithguard with psychic shooting. Vector Strikes failed. No reserves came in. At this point I was lagging behind in points. I got really bad Tactical Objectives, largely stolen by the Eldar.

Turn 3.
The Eldar just shuffled around, grabbing objectives for more points.
The Wraithblades moved up on the Horrors.
However, I unleashed Kairos on them. Finally, a great psychic phase resulted in their total annihilation.
I got to summon 10 Bloodletters with the warp storm, but they mishapped and got destroyed.
My reserves also got on the table, so I made them move up on the Dire Avengers. A nice combo: get the Seekers in, then Deep Strike the Furies with no scatter.

Eldar, turn 4.

My Reserves obviously got shot up, then charged. The Seekers presented an opportunity to get Assasinate and Hungry for Glory. Otherwise, everybody shuffled around to no great effect.
The Scorpions were whittled down due to a previous Khorne result on the warp storm table.

Daemons, turn 4.
A barrage of psychic shooting destroyed the Guardians, with the one survivor almost fleeing off the table - allowing me to grab that objective. I used the remaining dice to summon Daemonettes. At this point we were at 6-5.

Turn 5 and game end.

We both shuffled around to no great effect. However, the Eldar scored 3 points by grabbing and stealing objectives. I felt that I had no way to make up for that (plus the store was closing on us - again), so I called the game. My opponent was a good sport - he insisted on calling it a draw. His reasoning: an entire game's worth of shooting at my flying Daemons couldn't take off a single wound!

Post-game
  • My flyers are invulnerable vs psykers. I have a huge dice pool and high psyker levels. The Farseer got off at least 3 Psychic Shrieks (with 4-6 successes due to rerolls and not suffering wounds from Perils of the Warp), but everything was denied.
  • My psychic shooting suffers greatly from the missing Daemon Prince (see my last 1250 and 1500 point lists). I got two good psychic phases off; the other two were horribly ineffective.
  • Once again, my fodder died rapidly and didn't do much.
  • A more mobile army easily steals table control, since I've only got two durable units. This was compounded by the presence of D-weapons. I was too afraid to go into gliding mode, since a hit followed by a 6 on the D-table means no saves, not even 2+ jink or 2++ rerollable.

Wednesday, June 10, 2015

Chaos Daemons vs Space Wolves, 09.06.2015

I used my previous list, beefed up with a Soul Grinder and Screamers of Tzeentch.

Mission: The Emperor's Will
Map: Vanguard Strike
Lists: 1500 points
Chaos Daemons: Combined Arms Detachment
  • 3 Nurglings
  • 13 Pink Horrors, icon, instrument
  • 5-man Furies
  • 5 Seekers of Slaanesh 
  • 3 Screamers of Tzeentch
  • Kairos Fateweaver, warlord
  • Daemon Prince of Nurgle, exalted reward, lvl 3 Psyker, power armor, wings
  • Daemon Prince of Tzeentch, exalted reward, lvl 3 Psyker, power armor, wings
  • Soul Grinder of Nurgle, Phlegm Bombardment
The Nurgle Prince rolled on Biomancy and got the Grimoire of True Names, the Tzeentch Prince on Change/Biomancy and got the Portalglyph. (This is my usual setup.)

Space Wolves: Company of the Great Wolf Detachment, containing Arjac's Shieldbrothers
  • 2x Rune Priests
  • Grey Hunters with 2 meltas in Drop Pod
  • Blood Claws with 2 flamers and a Lone Wolf in a Stormwolf
  • Arjac and 5 Terminators with hammers/shields in a Land Raider (autocannon, heavy bolter sponsoons)
As we've later found out, the list was not technically legal like that. Lone Wolves are not Independent Characters, so cannot be attached to squads. Also, units are not normally part of two formations/detachments, so Arjac and his squad weren't part of the Great Wolf Detachment, so that wasn't legal because it needs 2 Elite choices. Anyway, the rules did not come into play at all, as there were no close combats where that would have mattered. The troops made it a valid Combined Arms Detachment, so no harm done.

We rolled for deployment. I deployed first, but stole the iniative.

Daemons, turn 1.
I got the top-right corner to deploy in, so that's where I put Kairos (white model) and the Daemon Prince of Nurgle (unpainted model). The Daemon Prince of Tzeentch and his buddies took the ruined tower. The Wolves only had the Land Raider on the table. I didn't have much to do, so I just swooped up with all three flyers. I also advanced with the Screamers.
I let fly with some psychic powers, but I only glanced the Land Raider once. On the other hand, I got 6 Daemonettes out of the Portalglyph (visible in the top left corner) and 6 other Daemonettes from the Warp Storm result.
Soul Grinder in normal Reserve; Furies in Deep Strike; Seekers will Outflank. The Nurglings infiltrated behind the bottom right tower.

Space Wolves, turn 1.
The Land Raider disembarked the Terminators, then shot the Screamers, killing two.
The Drop Pod landed and disembarked the Grey Hunters, who tried to melta the Portalglyph. They missed their shots.

Daemons, turn 2.

Very successful Reserve rolls got everything in: Grinder and Seekers in top right corner; Furies near the bottom.
The Nurglings move towards the objective. The Daemon Princes vector strike the Terminators, killing one.
Kairos glides over behind the Grey Hunters, and annihilates almost all of them with a psychic barrage.
The summoned Daemonettes run up towards the Drop Pod.
The Screamer assaults the Land Raider, managing one glance.
The Daemon Prince of Tzeentch suffers Perils of the Warp while attacking the Land Raider, getting 1 wound.
The Pink Horrors eat up the Overwatch of the Grey Hunters, who are then annihilated by the Daemonettes. First Blood!

Space Wolves, turn 2.
Stormwolf hovers in and disembarks the Blood Claws. Their combined firepower annihilates the Furies and the Nurglings.
Terminators get back into the Land Raider and move away.

Daemons, turn 3.

The Pink Horrors begin their move towards the objective.
The Grinder begins the slow advance to the other end of the table. Unable to run due to Slow and Purposeful, it ends up doing nothing for the rest of the game, except 1 glancing Harvester Cannon shot on the Drop Pod.
Seekers move up.
Screamer assaults the Land Raider, doing nothing.
The Nurgle Prince drops down to avoid flying off the map. Kairos moves up. The Tzeentch Prince vector strikes the Blood Claws and tries some psychic shooting. About 2 in 10 powers go off.
Both Daemonette squads assault the Drop Pod. With S3 Rending, they need to roll 6's to pen, then 5-6 for the Rending, to glance. 33 attacks result in 1 glance.

Space Wolves, turn 3.

The Terminators disembark once again. The Land Raider then shoots and kills the Screamer.
The Stormwolf concentrates on the Tzeentch Prince, bringing it down to 1 wound, but does not ground it.

Daemons, turn 4.

The Tzeentch Prince runs away to save its hide.
Kairos and the Nurgle Prince move up, vector striking and killing 1 Terminator.
Some psychic shooting deals 1 glance to the Stormwolf.
The Daemonettes were finally able to glance the Drop Pod to death.

Space Wolves, turn 4.


Everything fires at the Nurgle Prince. 2+ Jink save (backed up by Kairos' once-per-turn reroll) means no wounds are inflicted.

At this point, the Space Wolf player called the game. There was no way to kill Kairos or take my objective, and both of us could get Linebreaker, leaving the game to end at potentially 5-4. There was also the chance of my two fliers killing more stuff and steal the other objective, for a potential 8-1.

Conclusions
  • the Space Wolves were at a permanent disadvantage due to low model count.
  • 2 lvl 2 Psykers can't get many shots off against 2 lvl 3 and 1 lvl 4 Psyker.
  • however, they were very successful in denying, with Runic weapon + Psychic Hood giving a 12" 4+ deny bubble.
  • the Soul Grinder did nothing. At least he didn't die to a melta, thanks to being left in Reserve.
  • the Portalglyph summoned a single pack of Daemons; however, they were essential to the victory, by annihilating the Grey Hunters.
  • the Warp Storm did nothing. After the inital summoning (which only helped with killing the Drop Pod), I got 2 Nurgle results (no hits) and one nothing result.
  • due to the low model count of the Space Wolves, I largely had map control. This would have been essential in a Maelstrom of War mission.
  • also due to the low model count, my fliers could afford not to land and get stuck in close combat, instead whittling down the enemy with psychics and vector strikes. This denied the Wolves their greatest asset: excellent close combat abilities.

Monday, June 8, 2015

Home made putty

Introduction

The go-to putty for miniature modelers is, of course, green stuff. You can use that to mend broken miniatures, decorate them with hand-made purity seals and ribbons, fill in the gaps etc. However, sometimes you just need a lump of material somewhere, emulating a hill on a base. For that, much cheaper solutions exist.

My solution

Well, it's actually my wife's solution. She found this recipe on the internet, and prepared some to create Christmas decorations. When the putty turned out to be unsuitable for her needs, I was happy to jump in and put my hands on it.
So far, I've used it for the basing of two miniatures, but I'm planning on using it to create all sorts of markers in the future.

For this Daemon Prince, I've used the putty to fill in the middle gap of the metallic washer and create a small hill on the base.


The Masque of Slaanesh is an older, metallic model, intended for slotted bases. It looks silly when mounted on a washer; but that can be fixed by creating a small hill around the metal mounting.


How-to

Ingredients

  • 2 units of baking soda
  • 1 unit of starch
  • 1.25 units of water
where "unit" is whatever you want: cup, teaspoon, liter, gallon etc.

Preparation

***Disclaimer. The original post makes it look easy, but I didn't actually do this myself, so I can't comment on that.

Put everything in a bowl and mix it up; it should look milky. Beware that the bowl and/or the kitchen spoon might get discolored.
Start boiling it on a medium setting. Don't rush it. As soon as it starts boiling (for the cooking-illiterate: bubbles in the fluid), start mixing it. Don't let up until it becomes a hardened mass. It might look funny in the process; just keep mixing. This should take around 10-15 minutes, depending on the quantity.
When the mass has hardened (it's not flowing around and sticking to the bowl, instead becoming a lump in the middle), pull it off the fire. Use the kitchen spoon to move the putty from the bowl onto a plate (or into a box) and immediately wrap it in tin foil or a plastic bag. The goal here is to prevent it from drying out. Do this as quickly as possible; 5 minute of lying around is enough for the surface of the mass to dry out completely and become unusable.
Leave it to cool off. You can leave it like that for hours, provided that it's sealed tight. Once cool, start using it or wrap it tight in a plastic bag and put it in the fridge. It stays usable indefinitely (or at least a couple of months, like mine, which is still in the fridge and perfectly fine), and it's completely odorless.


When you need some, just open the bag, chip off a small piece (or whatever quantity you need), and seal back the bag. Apply it to the task at hand, then leave the miniature at room temperature. It should dry completely over night. If you're in a rush, the mass becomes paintable in about 10-20 minutes. Just be careful not to move it around, as it remains still malleable at this point.

Saturday, June 6, 2015

Painting a Daemon Prince

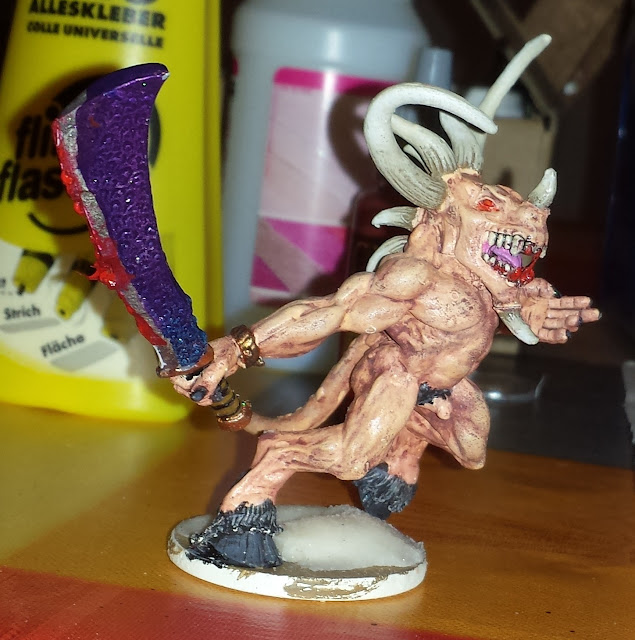
I'll present the techniques and colors used to paint my entry to our local painting competition: a model used as a Daemon Prince.

Introduction

First off, it's not an actual GW model; it's made by Hasslefree Miniatures: "Bugharoth". However, the paint scheme should work all the same; just don't stick power armor on your model!
I bought it in my very first batch of miniatures, assembled it, primed it with the graffiti spray, painted most of it in skin tone, and put it to use as a Daemon Prince. It's perfect size-wise, and it looks mean enough - an archetypical demon.

Originally, I intended a very simple paint scheme for it - skin tone, black wash, gunmetal weapons, black fur, white horns. Thankfully, I never got around to painting it like that. I instead did a bunch of basic models, improving my skills. Now, for this competition, I decided to have a go at this bad boy, and to try some advanced stuff on it.
Take a look at my practice paintjobs:

Planning phase

I actually did a thorough research and planning phase before reaching for my brush. I looked at a lot of painting tutorials (specifically the MWG Quick Tips) and planned my practice (the spawn above). Then, when I was sure of the techniques to be used and the look I wanted to achieve, I did a quick sketch on paper, detailing the paints/colors to be used on certain areas, as well as where I wanted to have highlights/shadows etc.
Don't judge my drawing skills here; the point was to create a detailed "task list".

Getting at it

 Step 1. The inside of the mouth

 I did this first because it's using strong and vibrant colors, and I didn't want that to accidentally spill out over already finished surfaces.

Add a little brown and/or black to the mix if it comes out too light.

Step 2. Basecoat

I've basecoated everything, as in the picture below.
These are the colors I've used:

Step 3. Skin

Normally, you'd do detailed skin areas using layering. Start from the darkest color, and layer on it ever lighter colors, leaving dark areas where you'd like shadows. I'll show you a rather quick-and-dirty alternate method: use a wash. Well, a wash-like mix. As I've previously said, I only have a black wash on hand; so I mixed up a reddish/brownish color and watered it down to a wash-like quality.


This is just to darken the skin. Let it flow freely across the surfaces and into the recesses; it will add some basic shadow effect.

Step 4. Some details

As per the design documentation:
  • bracer, sword crossguard and pommel: bronze. As usual, I lay my bronze over a coat of silver/gunmetal. I then give it a black wash to pop out the details.
  • sword grip: black basecoat, over which I layer some browns to achieve a leather-ish effect.
  • fur: strong grey drybrush, black wash, light grey drybrush.
  • hooves: dark grey highlight, black wash.
  • fingernails: black basecoat, dark grey highlight.

Step 5. Horns

I guess this qualifies as a "detail", but I spent more time here, and I thought to give it its own section. I layered on a heavy brown basecoat, slowly mixing in bone white with the brown, leaving more brown at the base of the horns.

Step 6. Sword

I wanted to achieve a supernatural look here. I first thought of lightning running across the blade; however, it's not a flat surface, so it wouldn't look good. I went for a blue-violet (transition through wet blending) coloring, with added lighting effects below.

Alright, we've got the basic color scheme in place. Time for some highlighting.

Step 7. Highlights

I wanted to make it look like the light source was the weapon itself. So I applied drybrushing over most of the model. However, I used a light color on the areas that would be directly illuminated by the sword, and a darker color where there would be shadows. Like this:


Step 8. Glowing red eye

I tried following this tutorial: MWG Quick Tips: Glowing red eye
It goes like this: Paint the eye red. Highlight it with bright orange. Then thin down the red paint using medium (don't use water, you want to thin it out instead of flowing around) and paint the area below the eye. This will give the glowing effect; like the eye would illuminate the area below it.
Sadly, it didn't come out as awesome as in the tutorial; I think more contrast is needed. e.g. do the glowing red eye on a model painted in black.


Step 9. Gore

Another MWG tutorial: MWG Quick Tips: Red gore
By mixing red paint with glue, you can get a shiny, reddish, viscous substance that emulates gore quite well.

I don't have shiny red paint, so I mixed in some gloss varnish. These are the materials I used:
Unfortunately, my first color mix came out too dark. Also, the glue dried to quickly; instead of saliva-like strings, I mostly got solid pieces. I put them to good use on the sword, making it look like guts stuck there from the last kill.
So here's how it looked like at first:
As I said, too dark. So I added some highlights with bright red:

Now we're talking!
In this picture you can already see how I started basing the model. Let's get to that.

Step 10. Creating the base

As usual, I've mounted the model on a metallic washer instead of directly mounting it on a base. Of course, you can get away with putting some flock on a metallic circle with a hole in the middle if it's a smaller (infantry-sized) model; but it certainly does not look good on a large model. So I opted for filling in the gap.
Instead of using expensive green stuff for work that does not need to be precise, I used a home made putty (article about that coming soon...) to create a rough terrain effect.

Step 11. Flocking the base

First off, I've coated the base with brown. If the workmanship is good enough, none of that will be visible. If, however, I can't flock the entire area for some reason, a brown spot won't stand out as much as a white one.
Then I applied some flock. I used the following:
And this is how it looks like:

In front of him, the ground is brown and the grass is green. In his wake, doom and destruction follows; the grass dries out and the soil itself dies!

Step 12. Finished!


Well, there's one more thing to do here. I want to apply a coat of matte varnish, to preserve what I feel to be my best work so far!